Jason's Simple Pellet Trap
-
Jason

- Uber Master Poster

- Posts: 3002
- Joined: Tue Feb 28, 2006 7:36 pm
- Location: Snohomish, WA
Jason's Simple Pellet Trap
First off, let me say that this design or probably many like have been published, and I make no claim for anything original in this design. This is my combination of ease of construction, low cost, very sturdy build, very low noise, and convenience of transportation. I'm calling it JSPT here because that's the name used when I get asked to make one. I've made a few of these and had a few friends copy the design. Feel free to copy any or all of it, and share your ideas for improvements. I hope improvements are made so future traps that I make can be even better. This is the total list of materials and costs.
Six foot 1x10 $8
Four medium binder clips $.50
Four wood screws $.50
Carry handle w/ screws $3
Seven 1 lb bars of duct seal $14
A couple dozen 18 gauge 1 1/4 nails from my little nail gun $.10
A little wood glue, optional and a few pennies' worth if you already have some wood glue
Here are the simple instructions for this very simple trap. Click on each of the pictures to see a bigger version of it.
1) Cut off the following lengths from the 1x10 and, if it helps keep track of what's what, write what they'll be used for on them with a pencil.
- Three sections that are 13" long. These will be the sides and back.
- Two sections that are 7 3/4" long. These will be the top and bottom.
- One secton 1" long. This will be the top part of the front.
- One section 2" long. This will be the bottom part of the front.

2) Clamp the three 13" sections and one 7 3/4" section together to form the back and sides, with the top clamped in. Use a little wood glue where the pieces touch, both to make the joints stronger longer and to provide a bit of lubrication to help you align everything perfectly. When it's all lined up and clamped, shoot a few nails to hold things in place. Then remove the clamps to get them out of the way and shoot the nails in where they were.

3) Do the same to the other end.

4) Line up the 1" long top section of the front, again using a little wood glue. The tension between the sides should hold it in place unless you really push on it. When you have it lined up properly, run a line of nails in the front and one from each side. Do the same to the 2" bottom section of the front, using two nails on each side. Presto, your box is done. All that's left is to add the clips and the carry handle, and then stuff the duct seal in there. Here are pictures of the finished box section, front and back.


5) Drill a 1/4 hole" through each side of the four medium binder clips. You'll need a center punch to mark the holes, or the drill bit will walk around like crazy on the clips. I clamped the clips in my vice to hold each side level. When you get all the holes drilled, squeeze the tabs to open each clip up far enough that that you can slip the screw into it. The shaft of the screw will go from the inside out one hole and the other hole will allow a screwdriver to be used to attach the clips to the trap. Note that I have washers on the screws in this picture, but they aren't really necessary. The screws I happened to have around and used for this trap had small heads and I thought the washers might help.

6) Drill an appropriate hole at each location for the binder clips. You can use this picture for reference, or just lay the clips out on the trap and lay a piece of paper on top of them to see where they should go. The hole diameter will vary with the shaft size of whatever wood screws you use, of course. Then place each clip in place, squeezing the tabs to give the screwdriver a straight shot at the screw head while you screw it in.

7) To add the handle, just line it up in the middle about 3/4 of the way to the back. Then you can mark the holes, remove the handle, drill the holes, and then install the handle. It needs to be that far back because most of the weight will be against the back wall.

8) Last but not least, unwrap each of the 1lb bars of duct seal and lay them one layer thick against the back of the trap. You'll probably need a putty knife or something to cut one or two of the bars to make them fit perfectly. You can squish the leftover duct seal into a flat layer and cover the whole thing a little deeper or just put it in the middle if that's where you intend to shoot most. Then clip a target on it and start shooting!

As for the reasons for this design, they are mostly as was stated at the beginning. It's not meant to be pretty. It's meant to be sturdy. I use these for everything from accuracy testing off my benchrest gear to letting the kids shoot their BB guns. The latter ends up with the trap itself getting shot, of course, so anything pretty about it would soon be gone. I use binder clips instead of the clipboard design because the clipboard design has not worked well for me outside in the wind. The binder clips hold the target securely at each corner. My initial design was made with a 1x8 instead of a 1x10, but the trap tended to get shot a lot more. Using a 1x10 actually leaves a gap on each side of the target as you can see from the picture. This can theoretically let some of the clutter out of the trap, but that hasn't happened yet in thousands of shots. Every single piece can be replaced quickly and cheaply. I don't have the wooden block at the bottom in the back of the trap, like some designs do and which would save approximately one pound of duct seal, because I frequently have the trap sitting on the ground and need to be able to shoot downwards at it. That means that I need the duct seal to go all the way to the bottom. If you intend to shoot very powerful airguns, feel free to double layer the duct seal. One layer has been plenty for me except for one time I shot the same spot 30+ times in a row tuning a fairly powerful PCP and actually did shoot a hole in the back of the trap... oops.
Well, there you have it, a simple silent pellet trap. Many thanks to all the other designs out there that provided ideas, especially the use of the duct seal.
Last edited by Jason on Fri Dec 02, 2011 9:24 am, edited 1 time in total.
-
quickster47
- Unclassified Poster
- Posts: 3
- Joined: Mon Nov 22, 2010 7:20 pm
Re: Jason's Simple Pellet Trap
You did a great job on your trap. But the best thing about it is, it's functional. Can't beat that. Good job. 
Carl
Carl
Life is good and retired life is even better!
-
daisy
- A Poster

- Posts: 238
- Joined: Wed Feb 07, 2007 8:05 pm
- Location: Pambula Australia
Re: Jason's Simple Pellet Trap
Here is one that I use. I got this off the net.
Try to get new carpet off cuts and use as many as needed. Tighten as required to stop pellet.
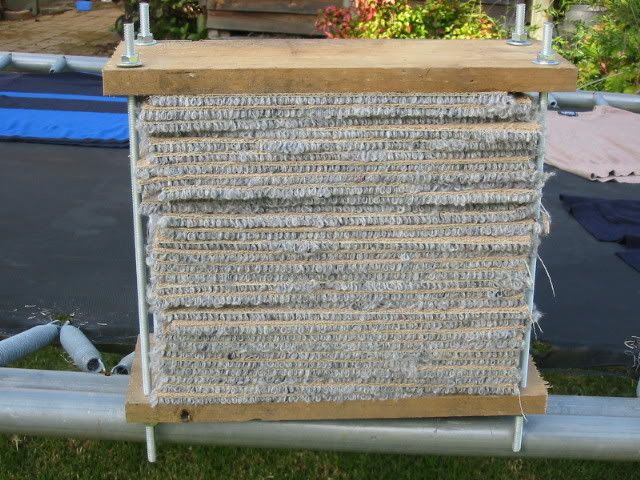
Try to get new carpet off cuts and use as many as needed. Tighten as required to stop pellet.
-
Jason
- Uber Master Poster
- Posts: 3002
- Joined: Tue Feb 28, 2006 7:36 pm
- Location: Snohomish, WA
Re: Jason's Simple Pellet Trap
I tried that one for a while and it was OK for outside. Inside my garage, it seemed way too messy, with paper pieces and carpet threads surrounding it after shooting for a while. Do you have a good way to contain the mess? Other than the long threaded shafts like that being pretty expensive around here, I really liked that design.
-
Finprof
- A Poster
- Posts: 108
- Joined: Sat Oct 25, 2008 11:32 am
Re: Jason's Simple Pellet Trap
Instead of building the trap out of wood, you can buy a sheet metal circuit breaker box from Home depot and fill it with the same putty that Jason uses.
Sorry. I am lazy.
Sorry. I am lazy.
-
daisy
- A Poster
- Posts: 238
- Joined: Wed Feb 07, 2007 8:05 pm
- Location: Pambula Australia
Re: Jason's Simple Pellet Trap
I never had a lot of mess as indoors, I used it for my 10m fwb 300s. With the bigger guns I use it outdoor at 25m with scaled paper targets.Jason wrote:I tried that one for a while and it was OK for outside. Inside my garage, it seemed way too messy, with paper pieces and carpet threads surrounding it after shooting for a while. Do you have a good way to contain the mess? Other than the long threaded shafts like that being pretty expensive around here, I really liked that design.
The threaded rod isn't too bad dear here. Also it's hard and expensive to source duckseal in Australia.
-
glen ring
- Master Poster

- Posts: 1084
- Joined: Wed Oct 25, 2006 3:04 pm
Re: Jason's Simple Pellet Trap
Jason
Great design! I'm making one this week. I've just started shooting airguns and I need all the ideas I can find. This trap will work well at the end of my porch!
Great design! I'm making one this week. I've just started shooting airguns and I need all the ideas I can find. This trap will work well at the end of my porch!
Just Be Nice 
-
Jason
- Uber Master Poster
- Posts: 3002
- Joined: Tue Feb 28, 2006 7:36 pm
- Location: Snohomish, WA
Re: Jason's Simple Pellet Trap
Bumping this to the top, as I've had a couple people send me PMs asking about it lately and I have to go find it every time. 
-
ShooterP14

- AA Poster

- Posts: 257
- Joined: Tue May 23, 2006 5:50 pm
- Location: Orlando, Fl
- Contact:
Re: Jason's Simple Pellet Trap
Jason,
I just noticed, 2000 posts.
Congrats!!


In another 20 years i'll get up there too.
I just noticed, 2000 posts.
Congrats!!
In another 20 years i'll get up there too.
The Wonderful White Winged Warrior - He's Everywhere! He's Everywhere!
-
Jason
- Uber Master Poster
- Posts: 3002
- Joined: Tue Feb 28, 2006 7:36 pm
- Location: Snohomish, WA
Re: Jason's Simple Pellet Trap
Ugh... if I go delete some, that will make it <2000 and get rid of the obnoxious colored chickens, right? 
-
webmaster

- Site Admin
- Posts: 196
- Joined: Mon Nov 14, 2005 10:58 pm
Re: Jason's Simple Pellet Trap
I might have to go change those for such a helpful guy.